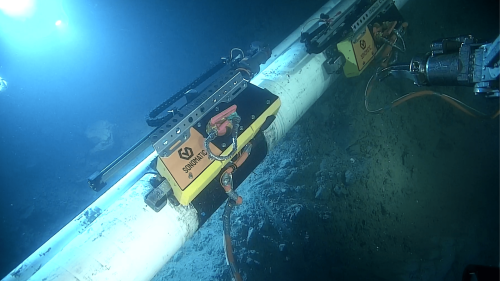
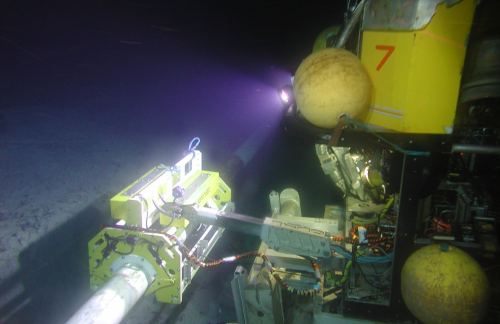
Pipelines are often inspected by In-Line Inspection (ILI) using intelligent pigging tools. These tools provide valuable information on pipeline conditions but given the challenges of inspection from the inside of pipelines, the accuracy of measurements can be limited. This can affect decisions on the integrity and remaining life of pipelines, the outcomes of which can be expensive, e.g. replacement or repair of a line.

ILI Verification
Consequently, pipeline operators will often choose to verify the wall thickness and extent of degradation features identified during an ILI run. This is most often done using externally applied inspection tools with enhanced accuracy.
Verification and Inspection Techniques
In the case of ILI verification, Sonomatic has a wide range of tools and techniques capable of performing high accuracy verification of any defects. Sonomatic tooling is deployable by divers or ROVs. Inspection tools and techniques are provided to be able to inspect through-coating inspections, piggyback solutions, weld inspection and field joint inspections.
Regardless of the defect location, Sonomatic can provide the technique and tooling best suited to provide the inspection requirement. Sonomatic can pair our in-field inspection capability with our integrity services team to make better use of the data collected. With this, we can “re-calibrate” ILI datasets, further interrogate ILI data analysis, target locations for verification and many more services.

- Through coating inspection
- Piggyback solutions
- Weld inspection
- Field joint inspection
- Internal and external defect solutions
Benefits of Automated Advanced NDT Verification of In-Line Inspection Results
In-line inspections are a great choice for many projects, as they come with multiple benefits. However, there is often a requirement to verify and monitor indications noted by the in-line inspection. Performing this verification with automated advanced inspection techniques provides benefits including but not limited to:
Saving costs
Target only areas with indications for verification and online monitoring. The ability to repeat and monitor any indications can extend the life of an asset and extend inspection intervals.
Status and information
With the appropriate pipeline access, automated advanced NDT inspection data measurements can be invaluable to your pipes from an informational standpoint. Data gathered from the inspection can determine whether pipes on a project function properly, have any leakages or other defects, or if they need replacing altogether.
Consistent operation
Being able to provide accurate information (as mentioned above) without the complexities involved with intrusive inspections, the operation of pipes can remain smooth and consistent throughout the project.
Frequently Asked Questions
Automated corrosion mapping involves scanning the pipeline to determine the minimum remaining wall thickness for each position and can be achieved using an advanced automated ultrasonic tool. The systems deployed, produces comprehensive high-quality data that can be displayed in different views to easily identify and/or verify any areas of concern. Sonomatic Inspection Management Software (SIMS) is used to generate 2D and 3D thickness map composites to improve efficiency in data management during the collection phase, and assists in semi-autonomous data analysis and reporting.
Time of Flight Diffraction (TOFD) is a method of accurately sizing and monitoring the through-wall height of in-service flaws. It is effective for weld inspection flaw detection irrespective of the flaw type or orientation. TOFD doesn't rely on the reflectivity of the flaw but uses diffracted sound initiating from the flaw tips. TOFD's main advantage is that it has a through wall height accuracy of +/- 1 mm, and a crack growth monitoring capability of +/- 0.3 mm, on defects of all orientations.
Dynamic Response Spectroscopy (DRS™) is a proprietary technology developed by Sonomatic using frequency-based ultrasonic wall thickness measurements. It is a corrosion mapping technique that applies a broad range of low ultrasonic frequencies (<1 MHz) to penetrate challenging coatings such as composite repairs, PE and Neoprene, and excites the natural frequencies of vibration of the underlying steel. The DRS™ probe raster scans over an area of interest and collects response signals. Advanced signal processing algorithms have been developed to extract the vibration frequencies and map the wall thickness profile.
Pulsed Eddy Current (PEC) is a comparative technique whereby advanced processing of the eddy current signal decay and comparison with a reference signal, allows for the determination of the average wall thickness (AWT). This fast screening method allows for the assessment of the general condition of structural steel and is best suited for general corrosion type defects in subsea pipelines. A major benefit of PEC is its ability to inspect through concrete weight coating, challenging coatings and marine growth.
Angle shear wave methods are widely used in NDT and in most applications the probe is manually manipulated. There are, however, significant benefits to automating the process, both in terms of probe manipulation and data collection. The benefits include the following:
- Consistent performance with minimised human factors effects
- Substantially improved probability of detection (POD)
- Improved sizing capability
- Accurate positional control
- Accurate position information for each scan
- Full recording of all data for more detailed analysis
- Reliable repeat comparisons
Automated shear wave pulse echo is used for a variety of applications, some examples are listed below:
- Inspection of welds to detect and size planar flaws.
- Inspection of corrosion-resistant alloys for stress corrosion cracking.
- Inspection of corrosion-resistant alloys for chloride pitting.
- Inspection of materials in wet H2S service for vertical cracking elements.
EMAT technology is performed from top-of-line and has the capacity to detect internal and external corrosion on subsea pipelines with NWT <15 mm with coating thickness up to 4 mm. The technique does not require direct coupling as the input and received signals are generated by electromagnetic responses. This screening technique provides details of the lateral extent of corrosion with banding to indicate the through-wall severity level.
Multiskip is an ultrasonic rapid screening technique for corrosion and erosion detection on subsea pipelines ≥4” diameter. It uses two transducers mounted on wedges in a pitch-catch to send angled shear wave beams through the pipe wall by skipping multiple times off the ID and OD surfaces. The system is capable of high-speed, high-resolution data collection. For corrosion, loss of signal amplitude, reduction in signal arrival times, and changes to signal shape are used to provide qualitative and quantitative information.
Alternating Current Field Measurement (ACFM) is an electromagnetic technique for the detection and sizing of surface-breaking indications. It works on most metals, does not require direct contact and works through various thicknesses of coatings. ACFM can accurately detect and size linear indications both length and depth. It is also easier to use on complex geometries such as nodes and nozzles.
A phased array is a unique ultrasonic probe consisting of a group of transmitters or receivers, allowing for precise control of sound waves. When used as a transmitter, the timing of element activation creates interference that can shape and angle the beam. As a receiver, the time differences between pulse arrivals at each element provide information about the pulse source's location. Similar to how our ears work, phased arrays can pinpoint sound directions. Unlike traditional twin-crystal probes, phased arrays adjust signal phases for desired beam angles. However, their performance relies on the number, size, and spacing of elements, requiring specialised signal processing equipment. Phased arrays are widely used in radar, sonar, and medical applications but face challenges in NDT ultrasonics due to metal penetration and wave mode issues.
Ultrasonic testing utilises sound waves to detect corrosion within materials. This NDT technique utilises array transducers that pulse elements in a sequence called phasing.
Eddy Current Testing (ET) is used to measure the intensity of electrical currents in a magnetic field. Eddy current testing utilises AC current in a coil near or around a specimen, inducing circulating eddy currents in the material's surface. Flaws and material differences affect these currents, altering the coil's current via mutual induction. Flaw detection relies on measuring electrical changes in the coil, often focusing on voltage changes. Key factors influencing eddy currents include specimen conductivity, magnetic permeability (for ferromagnetic materials), coil-specimen distance, AC frequency, and dimensions. Calibration on test specimens is common, and eddy current testing is highly sensitive to flaws. Equipment ranges from basic meters to advanced computer-programmed systems, with applications including crack detection, component sorting, and metal quality control.
